Pages

Wednesday, April 29, 2015

Homemade Almond Dates Milk

I am not really milk drinker. Perhaps flavoured milk, but it's just once in blue moon I have the craving for one
When I decided to attempt on making almond milk, it's just a curiosity on my head
I did try store bought one in tetra pak, and I didn't really enjoy drinking it, mostly because of the strong smell of almond extract, which I hate
So, I was like, well, perhaps I could make better. So I tried. And it's something that I will not regret at all. In fact, I will be delighted to have this every single morning for breakfast! Yes, it's that delicious!
Oh, I'm a convert. Now I'm officially a milk drink. Homemade almond milk, that is :)


Recipe is from Oh She Glows

What you need:

1 cup raw almonds, soaked in water
3.5 cups filtered water
3 large pitted Medjool dates, chopped
3/4 tsp vanilla extract
small pinch of salt
1/4 tsp cinnamon (I skipped)

Method:
  1. Soak almonds in water for 8-12 hours (I soaked mine about 15hours)
  2. Soak dates for about 1 hour prior to making the milk. This step is optional, only when you feel the dates are too dry
  3. Rinse and drain almonds and place into a blender with filtered water, dates, and vanilla extract and blend on highest speed for about 1min
  4. Place a nut milk bag (I used cheese cloth but I reckoned nut milk bag is a better choice) over a large bowl and pour almond milk mixture into the bag. Gently squeeze the bottom of the bag to release the milk
  5. Pour milk into a glass jar, store in the fridge for up to 3-5 days. Shake jar very well before using as the mixture separates when sitting

This thick, creamy and delicious milk is so yummy on its own, to eat with cereal, to cook oatmeal or to make overnight oats. I was thinking to make some of the milk into chocolate flavoured, but perhaps next time. Meantime, I just enjoy this milk plain, something I almost never do! :)


This post is for Best Recipes
Recipe links HERE


Is that the reflection of my head on the glass? LOL


Tuesday, April 28, 2015

Mock Buffalo Chicken (Happy Call)

Why I call it 'mock'? Because it's definitely not the seasonings used to cook buffalo chicken
But why the name then? Because that is where the inspiration came from LOL
Yes, I was craving for buffalo wings, the commonly found in the US, finger licking delicious
But too bad my kids do not really fancy, I believe it's the spiciness and smokiness part that they're not used to
So, after searching for some idea for modification, I found one recipe I was pretty convinced my kids will be able to accept. True enough, they didn't complain and enjoyed their meal :)
Here's the mock version I cooked...


This dish is seriously good eaten with hot fluffy rice. I actually increase the quantity of the sauce since my kids love mixing it with the rice :)
 
Here's the recipe with my modification...
 
What you need:
 
750g chicken parts
(I used 1 free range chicken, cut into parts)
 
Marinade:
juice of a large lime
3 cloves of garlic
1 inch old ginger
1 inch yellow ginger
3/4 tsp salt
1/4 tsp ground pepper
 
Sauce:
1 medium onion, sliced
12 tbsp (about 170g) tomato ketchup
3 tbsp sweet dark soya sauce
3/4 tsp chicken stock powder
1/2 tsp ground pepper
1 1/2 tbsp sugar
1 1/2 tbsp butter
 
Method:
  1. Grind together garlic, both gingers til smooth
  2. Rinse chicken and rub all over with lime juice. Add in garlic and ginger mixture, salt and pepper
  3. Rub all over evenly inside out until all chicken parts covered and set aside for a few hours (ideally overnight)
  4. Slightly oil Happy Call pan and arrange marinated chicken on it. Cook chicken over low fire til browned both sides. Transfer chicken to a bowl and clean the pan with kitchen towel
  5. Heat butter on the same pan and sautee onion til soft and fragrant. Add in tomato ketchup, dark soya sauce, chicken stock powder, pepper, and sugar, mix well. Test the taste and adjust accordingly
  6. Add in chicken and mix well til all coated with sauce
  7. Simmer for about 5 mins each side over low fire and transfer to a serving plate
  8. Serve immediately with hot fluffy white rice


This post is linked to the event, Little Thumbs Up organised by Bake for Happy Kids and My Little Favourite DIY, and hosted by Diana from the Domestic Goddess Wannabe


Monday, April 27, 2015

Orange Almond Dates Biscotti

This is actually my homework for Avid Bakers Challenge in February this year which I missed out
I finally did this, one yummy crunchy sweet munch, love it :)


Recipe is from Scientifically Sweet

What you need:

270g all purpose flour
2 tsp baking powder
1/4 tsp salt
100g whole raw almonds
75g unsalted butter
zest of 1 orange
2 large eggs
150g sugar
1 tsp vanilla extract
1/2 tsp almond extract (I skipped and I added another 1/2 tsp of vanilla extract)
85g dried dates without seeds, chopped
1 large egg, well beaten

Method:
  1. Preheat oven to 180degC, line a baking sheet with parchment paper
  2. In a large bowl, whisk flour, baking powder and salt. Stir in almonds, set aside
  3. In a small pot, melt butter and orange zest, set aside to cool slightly
  4. In another bowl, whisk eggs to blend. Gradually add in sugar, whisk til smooth
  5. Slowly whisk in melted butter and vanilla extract, and almond extract if using
  6. Pour this mixture into the flour mixture and stir til most flour absorbed. Add in dates and stir til soft sticky dough formed and dates evenly distributed
  7. Transfer dough to a lightly floured surface and divide into two parts. Roll each into 11 inches long log, flatten by hand until it's about 3 inches wide
  8. Brush top and sides with beaten egg and bake until golden brown and slightly cracked at the top, about 25mins
  9. Transfer baking sheet to a wire rack and let biscotti cool on the pan til cool enough to handle, about 10mins or so. Reduce oven temperature to 150degC
  10. Transfer each log to a cutting board and cut into slices, each approximately 3/4inch. Cut using serrated knife with a gentle sawing motion
  11. Place cookies, cut side down, back on the baking sheet and bake til very lightly golden, dry and crisp about 7mins each side
  12. Remove from oven and transfer cookies onto cooling rack. Let cool completely before storing into airtight container

I should have baked longer to get more browned top. And also, I had problem slicing the cookies because of the whole almond in it. I ended up having thick slices that I had to extend the baking time for each side to about 15mins


Yum! I love biscotti. Perfect with a cup of black coffee in the morning (or afternoon, or evening LOL)


This post is for Best Recipes
Recipe links HERE

Sunday, April 26, 2015

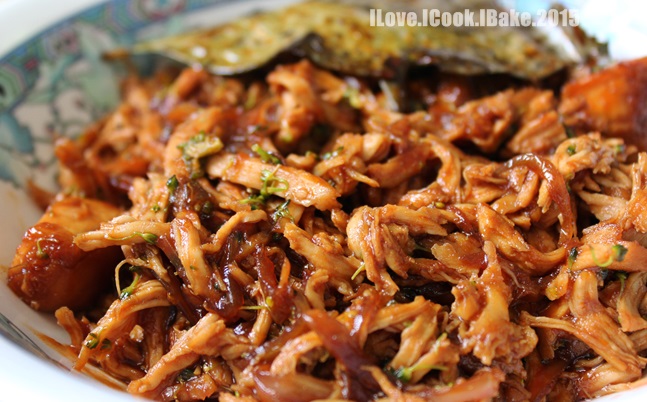
Shredded Chicken in Worchestershire Sauce

This is one delicious dish that can make you end up eating lots of rice :)
Aside from the shredding of the chicken, it's relatively easy to make
So, if unlike me you find shredding chicken is not a hassle at all, then it's definitely one easy peasy dish to prepare :)


Recipe is from Catatan Nina
 
What you need:
 
500g chicken breast / fillet
cooking oil
 
Marinade:
1 tbsp oyster sauce
1/2 tsp salt
 
1 medium onion, julienned
3 cloves of garlic, minced
1 cm old ginger, lightly pounded
1 cm blue ginger, lightly pounded
1 Indonesian salam leaf
3 tbsp tomato ketchup
2 tbsp sweet dark soya sauce
1 tbsp worchestershire sauce
1 tbsp chilli sauce (skip if for children consumption)
1/2 tsp salt
1 tsp sugar
1/4 tsp ground pepper
some water
 
Method:
  1. Rinse chicken and marinate with oyster sauce and salt, set aside for about 30 mins (the longer the better) Heat oil in a wok and fry pan fry chicken til browned. Transfer to a plate, let cool slightly, shred the chicken and set aside
  2. Using the same wok, heat oil and sautee onion and garlic til soft and fragrant. Add in old ginger, blue ginger and salam leaf, mix well
  3. Add in tomato ketchup, sweet dark soya sauce and worchestershire sauce, mix well. Add in salt, sugar and pepper, mix well, test the taste
  4. When the preferred taste achieved, add in shredded chicken, add in water and simmer for approximately 15mins
  5. Transfer to a serving plate and serve immediately
 
Yum yum :P


This post is linked to the event, Little Thumbs Up organised by Bake for Happy Kids and My Little Favourite DIY, and hosted by Diana from the Domestic Goddess Wannabe


Rice please! Rice! :)
 

Wednesday, April 15, 2015

ABC April 2015 Fudgy No Butter Gluten Free Almond Brownies

This recipe intrigued me. Luckily I was able to find time to bake it this morning
I mean, brownies with ground almonds, no butter, no gluten, no dairy, and it's fudgy? Must try, isn't it?

I must thank Hanaa, the host of Avid Bakers Challenge, for choosing this recipe, a fab one from Scientifically Sweet. Boy, this brownies is good, really good! :)

I laughed when I read how Christina described two little things that scare her. First, sharks. Second, baking without butter LOL I find it's so amusing, the mind of an avid baker :)

Yummy yummy brownies using a significant amount of almond meal which surprisingly works really well!


Super chocolaty, super fudgy, super delish! :)


Still not convinced with the pic above ? Look below! Too bad some parts are blurry haha..
It's so moist and fudgy I had problem making a neat cut! It's not an issue to me, by the way, cos I'm a happy girl while eating this chocolaty heaven :P


I made no change at all, except sung semi sweet chocolate chips instead of bittersweet
For full recipe, please view HERE

Abby loves this brownies, she ate a big slice in no time. Ian was sceptical after knowing there's almond in it, he did try a bite but after that said no more. Yeah, my fussy food critic in the house LOL
He did nibble some of the choco chips though. Look at his chubby fingers :)


Should I say this brownies is healthy? I personally think it's not really healthy as quite a lot of icing sugar is used, but it's definitely healthier than the usual brownies :) Talking about healthy, I wonder if this recipe works well with maple syrup or honey or fine brown sugar or coconut sugar...hmmm...probably I should try out :P
 
I found it's a little too sweet. I suspected it's the semi sweet chocolate chips. I didn't have bittersweet chocolate chips in hand, but I actually have 70% dark chocolate, should have used that instead. But, it's okay, I'm still one happy girl :)
 
 
This post is for Avid Baker's Challenge February 2015, a baking event hosted by Hanaa from Hanaa's Kitchen 


Also, this post is for Best Recipes
Recipe links HERE


Friday, April 10, 2015

Gluten Free Almond Flour Pizza Crust

This recipe intrigued me, especially since the source is from King Arthur Flour
I by far have never encountered any recipe from this site which failed me, it always ended up with a big hurray :)

So I gave it a try, not because I have problem with gluten, it's more to my curiosity for the texture and taste.
Easy to make, no kneading, proofing and waiting whatsoever. I used tomato sauce base and sprinkled with grated parmesan cheese. Topped up with sliced cherry tomatoes and Japanese cucumber, and lastly sprinkled with shredded mozzarella cheese. After baking, here it is - warm and crisp :)


What you need:

216g almond flour
14g coconut flour
1/2 tsp baking powder
1 tsp dried Italian herbs (optional - I skipped)
1/2 tsp salt
1/2 tsp ground black pepper
3 large eggs
25g olive oil

Method:
  1. Preheat oven to 175degC
  2. Whisk together almond flour, coconut flour, baking powder, herbs, salt and pepper, set aside
  3. In a separate bowl, whisk eggs and oil til frothy
  4. Mix in eggs mixture into the flour mixture, mix til shaped like a dough
  5. Shape into ball and transfer onto a lined with parchment paper work surface. Top with another parchment paper and roll til about 1/4" thick
  6. Remove the parchment paper on the top and slide the flattened dough with the parchment paper at the bottom into a baking sheet
  7. Bake the crust for about 15-20mins until the edges turned crisp and the surface started to get browned all over. Remove from oven (at this stage, you may freeze the dough for later consumption)
  8. Top with your preferred toppings (this time I used tomato based pasta sauce, grated parmesan cheese, sliced Japanese cucumber, halved cherry tomatoes and shredded mozzarella cheese - in that order), and return it to the oven. Bake for another 12-15mins, til cheese melted and the edges are golden brown. If you like browned cheese, broil the pizza for 1-2mins after baking
  9. Remove the pizza from the oven and serve


I like the combination of the crispy crust, the crunch from the cucumber, the juiciness from the tomatoes and the sauce, and both cheeses completed the taste. Yummy! Come, have a bite! :)


Honest opinion..
Taste wise, this cannot be compared with the usual normal yeasted bread pizza crust, it's just different. It definitely doesn't have the bread like texture, it's rather grainy, but it goes very well with the topping. I did eat a little bit of the crust without any topping, it's nice when warm and crispy
It's crisp when eaten right after baking, but gets soft and crumbly pretty fast, so my advice is, eat immediately after baking! :)

Will I bake this again? I don't think so, mainly because I was the only one in the family eating it, DH and the kids couldn't really accept it
But it's a good experience I will not regret, and one thing for sure, this is a must try for those having problem with gluten. One of the best alternatives, I must say :)


This post is for Best Recipes
Recipe links HERE


Wednesday, April 8, 2015

Vietnamese Chicken Salad

Yummy and refreshing, spicy and tangy, lovely salad :)


Recipe is from Peng's Kitchen

What you need:

450g cabbage
1 tsp salt
250g chicken fillet (I used chicken breast)  , poached and shredded
25g shallots, thinly sliced
3 stalks coriander leaves, chopped coarsely
3 stalks spring onion, finely chopped
3 tbsp lime juice (I used large lime)
2 tbsp fish sauce
1 heaped tbsp coconut sugar (I added)
5 cloves of garlic, minced
2 chilli padi, finely minced
fried shallots (I didn't use)
roasted peanuts (I didn't use)

Method:
  1. Cut cabbage into thin strips. Add in 1 tsp salt and mix well, set aside for awhile til the cabbage turns limp. Squeeze dry
  2. Mix in lime juice, fish sauce, coconut sugar, garlic and chilli padi
  3. Mix in cabbage, chicken, shallots, coriander leaves and spring onion in a big salad bowl
  4. Drizzle the lime dressing and toss evenly
  5. Sprinkle fried shallots and roasted peanuts on top if using


This post is linked to the event, Little Thumbs Up organised by Bake for Happy Kids and My Little Favourite DIY, and hosted by Diana from the Domestic Goddess Wannabe 

LinkWithin

Related Posts Plugin for WordPress, Blogger...